DCAS Open EdX Documentation

DCAS Open EdX Documentation

  • Docs

›Adding Problems

Creating a Course

  • Create a New Online Course
  • Set Course Schedule & Details
  • Add Sections, Subsections & Units
  • Managing Unit and Component
  • Adding Videos
  • Adding HTML
  • Adding Discussions
  • Adding Problems

    • Adding Problems
    • Problem Types
    • Drag and Drop
    • Pointing on a picture
  • Adding Images and Figures
  • Uploading Static Content
  • Course Visibility
  • Creating pages
  • Grading
  • Commonly Used Advanced Settings

Running a Course

  • Managing Certificates
  • Common Instructor Dashboard Tasks
  • Managing Course Discussions

Advanced Management

  • Importing / Exporting Courses
  • Change a user’s password
  • Inactivate / Activate a User
  • Understanding User Roles
  • Set a user to staff or superuser
  • Server Tasks

    • SSH into Server
    • Set or Change a Password

Migration

  • Migrate EdX (Single-Server)
  • Migrate the Theme

Migrate MySQL

  • Migrating MySQL Database off of Single-Server

Migrate Mongo

  • Migrating Mongo Database off of Single-Server

Configuration

  • Enable and Update Additional Languages
  • Enable Downloads from Instructor tab in LMS
  • Configure and Enable Certificate
  • Configure Open Response Assessment

Configure Ecommerce

  • Basic Ecommerce Setup
  • Setup JWT Keys
  • Getting Course Details on Checkout Page
  • Troubleshoot Ecommerce

Discovery Setup

  • Configure Discovery

Comprehensive theming

  • Setup Comprehensive Theming

Microsites

  • Setup Microsites
  • Common Microsite Configurations

API

  • Setup API
  • Common APIs Demonstration
  • Customizing an API
  • DCAS API Handoff for LMS

Xblock

  • Xblock introduction
  • Xblock installation and uninstallation
  • Xblock Development

Scaling the architecture

  • Scaling Mongo
  • Scaling MySQL
  • Dedicated Storage Configuration Outline
  • Azure Storage Configuration

    • Azure Storage Configuration
    • Basic Configuration
    • Private Blob Configuration

SCORM

  • SCORM Azure Storage

Trouble-Shooting

  • Forgot admin username or password
  • Server error
  • Can't reach your site
  • Problems with RabbitMQ
  • Can't login to LMS or CMS
  • Locate the error
  • Jobs are stucking
  • Mongodb not working
  • Forums Breaking Issue
  • Check open edx services status
  • Problem with mysql
  • Can't receive email
  • CSRF token error

Adding Problems

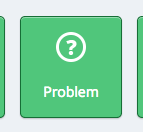
  1. Click the ‘Problem’ Component. Add a problem

  2. Choose your problem type. For this training, we’ll use ‘Multiple Choice’. Multiple choice questions

  3. An editable problem component appears. Click ‘Edit’ on the top right. Edit

  4. Ensure that ‘editor’ is selected, and edit the following components. Editor Editor Display

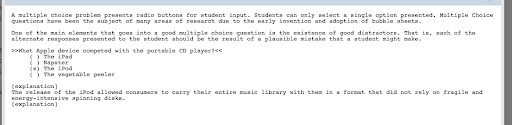
    1. Intro text – This is optional explanatory text and has no start or end tags. Editor Display Intro Text

    2. Problem text – This is the text for the problem. It is contained in >> << tags. Editor Display Problem Text

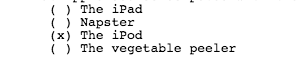
    3. Answer set – Answers should be added one per line with parentheses ( ) at the beginning of each line. Correct answer(s) are marked with an x within the parentheses. Editor Display Answer Set

    4. Explanation text – This is optional text that will show up when a student asks for a hint/explanation. By default, this is only allowed after the problem has been completed, but can be changed in the advanced settings.

  5. Click ‘Settings’ in the top right and edit the following settings.

    1. Display Name – This is displayed when a user mouses over the courseware unit that contains this component.

    2. Maximum Attempts – This defines the maximum number of attempts that a student can try a problem before their answer is locked. Their most recent answer is always the one locked.

    3. Problem weight – Each problem in an assessment can be worth a different point value. By default, the value is one point.

    4. Randomization – This will re-arrange answers in a random order. Further information is not in scope of this training.

    5. Show Answer – Choose from the following.

      1. Always – A student can always click ‘Show Answer’ and see the correct answer and the explanation.

      2. Answered - Show the answer after the student has submitted her final answer.

      3. Attempted – Show the answer after the student has tried to answer the problem one time, whether or not the student answered the problem correctly.

      4. Closed - Show the answer after the student has used up all his attempts to answer the problem or the due date has passed.

      5. Finished - Show the answer after the student has answered the problem correctly, the student has no attempts left, or the problem due date has passed. [default]

      6. Correct or Past Due – Show the answer if a student has answered correctly (so they see the explanation in addition to their correct answer) or when the due date has passed. If no due date has been set, then the answer will never be available.

      7. Past Due – Show the answer when the due date has passed. If no due date has not been set, then the answer will never be available.

      8. Never – Never show the answer.

  6. Click Save to finalize your changes. Save

  7. Don’t forget to publish your changes to make them public.

← Adding DiscussionsProblem Types →
DCAS Open EdX Documentation
Docs
Create an Online Course
More
Curricu.me Website
Copyright © 2022 DCAS